SnapFrames Guide
Everything you need to design, print, and assemble your custom frames.
Jump to section
Use the walkthrough for an interactive tour.
Generator Workflow
Enter Your Build Plate Size
Select your 3D printer's build plate size. Generated frame components will be automatically sized to fit your build plate, with parts split as needed for larger frames.
Smart Orientation is enabled by default. It automatically rotates pieces 45° diagonally when doing so reduces the number of seams in your frame. If diagonal orientation doesn't reduce piece count, it stays orthogonal for better bed packing.
Set the Frame Interior Dimensions
Enter the exact interior opening you want for your artwork or photo. The frame will be generated to these interior dimensions. Generate a frame about 0.2mm larger than your artwork for an easy fit.
Choose Your Frame Shape
Pick the overall shape of your frame:
- Rectangle — the standard four-sided frame.
- Hexagon — a six-sided frame with full snap-fit assembly support: six edges, each with its own corner and connector pieces.
- Circle, Oval, and Arch — rounded shapes for a softer, gallery-style look.
Rectangle and hexagon frames can be generated at any size as snap-together kits, split into build-plate-sized pieces. The rounded shapes (circle, oval, and arch) generate as one-piece frames, sized as large as will fit on your printer in a single print.
Choose Your Edge Profile
Edge Type is organized into tabs — Picture, 3D Art, Floater, and Litho. Each tab offers built-in Standard and Minimal profiles (plus any customs you’ve saved), and a live Profile card with sliders to fine-tune the selected cross-section.
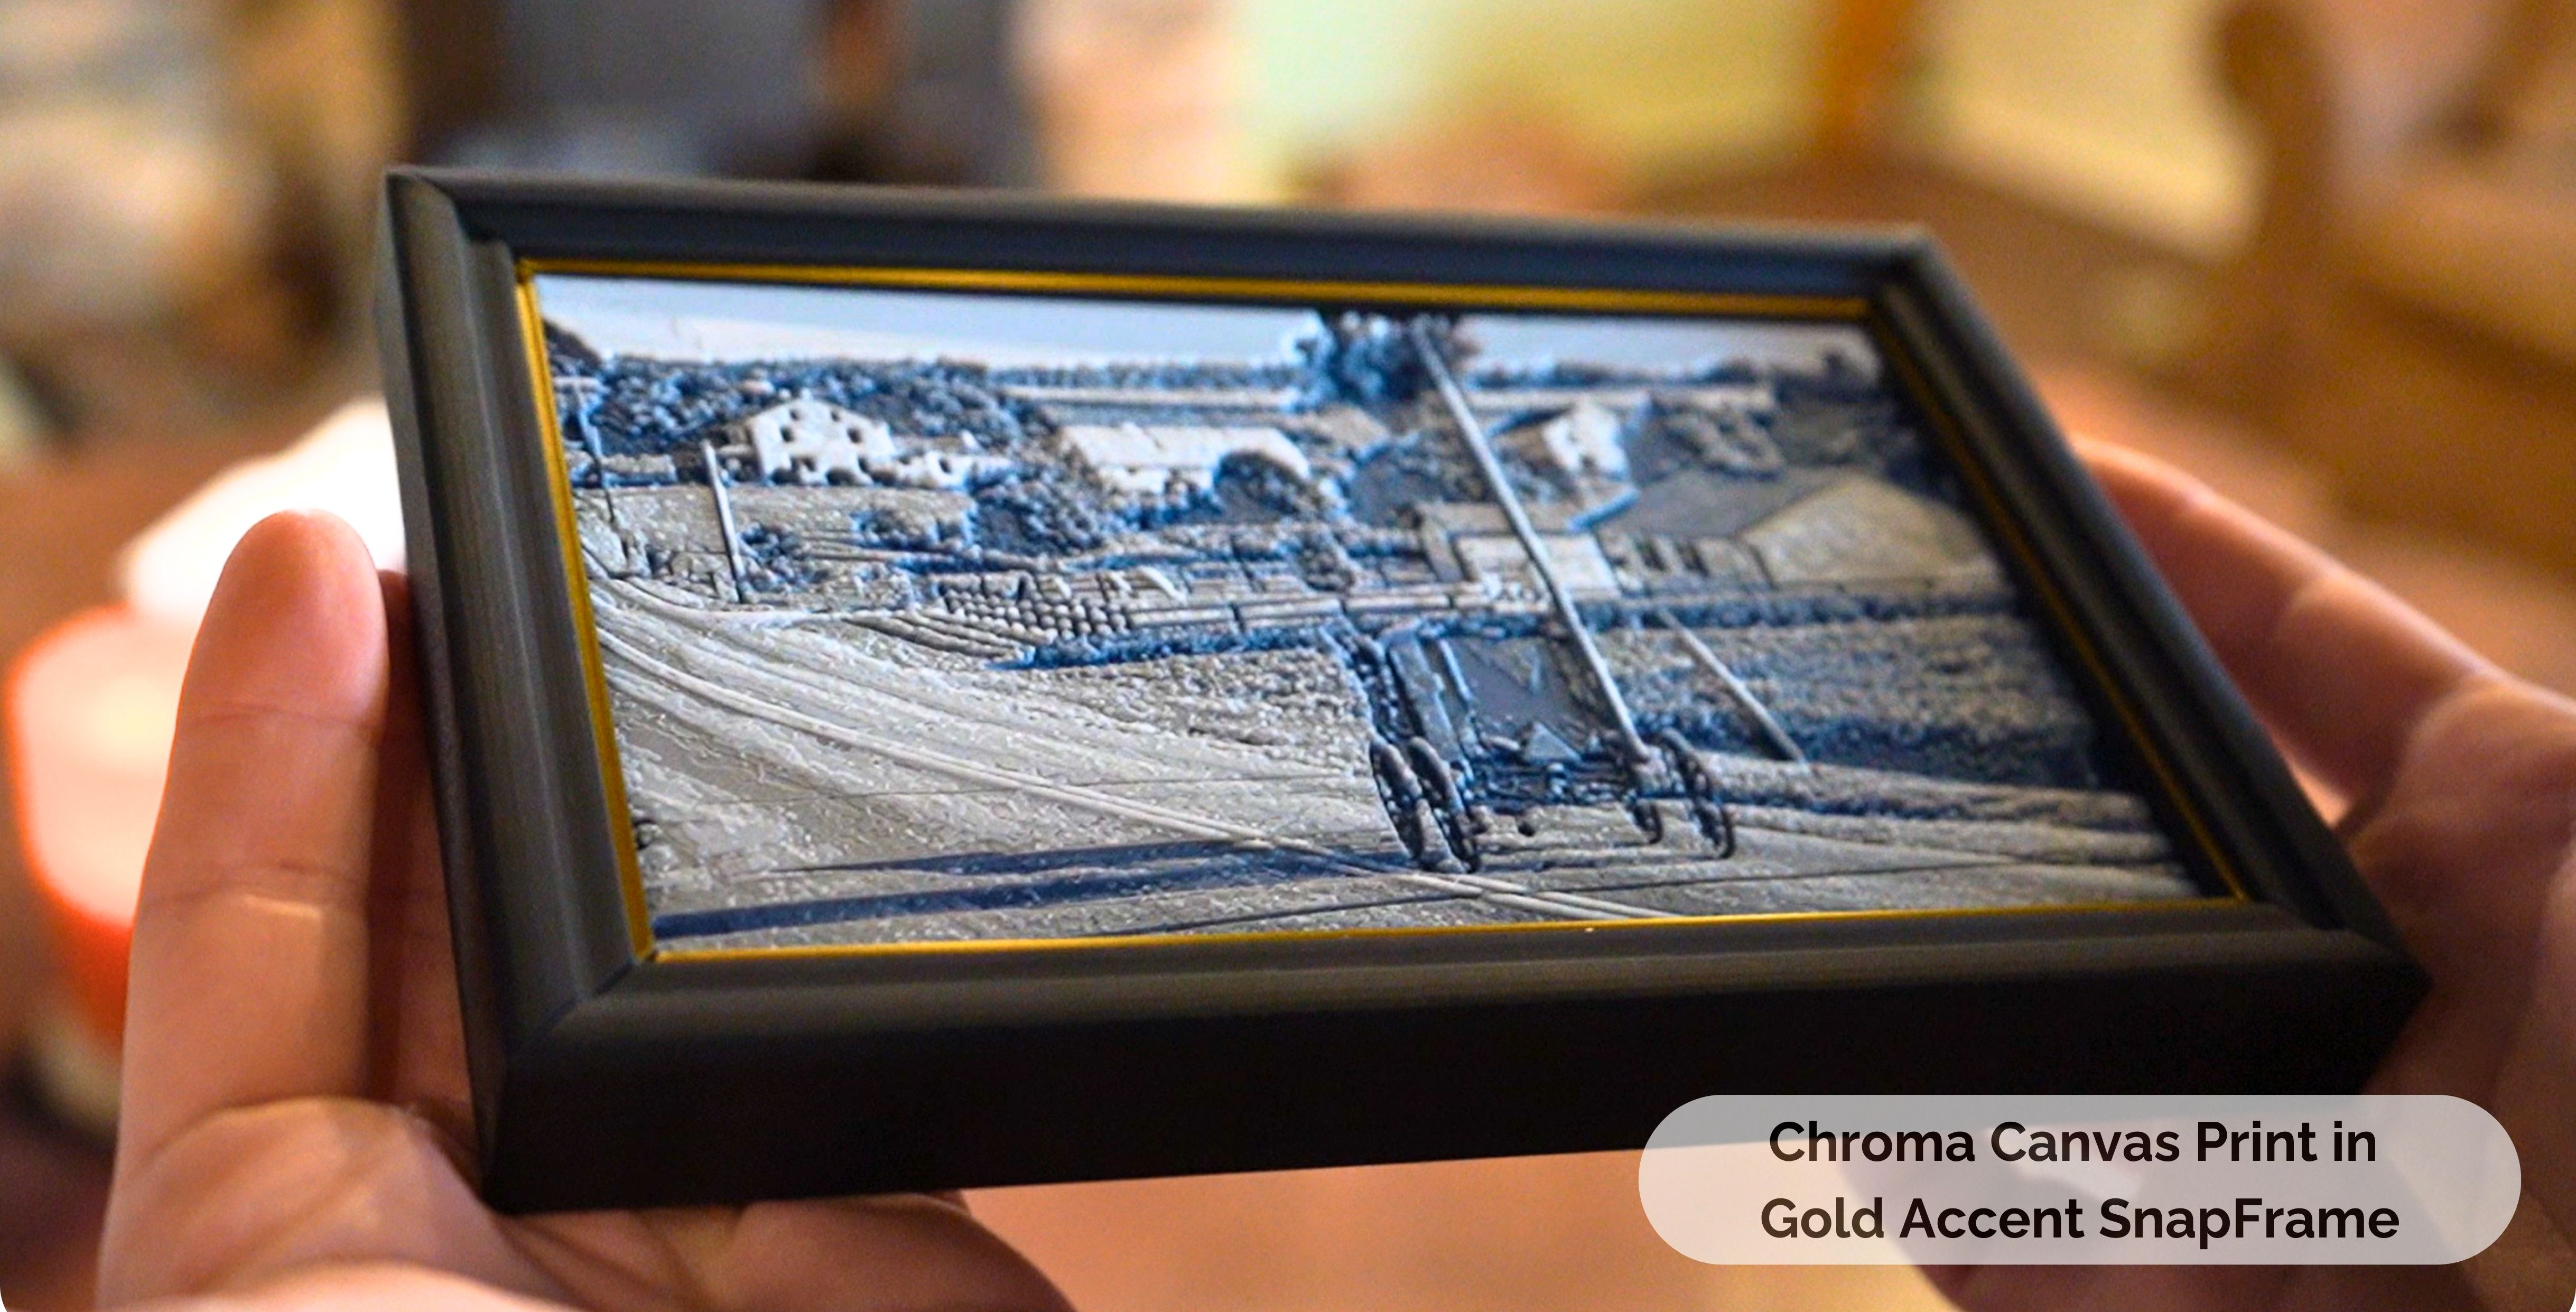
Picture Frame
Best for traditional photo and glass displays, HueForge 3D prints, and other thin artwork. Set your piece’s thickness with the blue Art slider on the Profile card — the prongs flex to grip a ~3mm range around it.
- Artwork secured from back with removable 3D printed prongs
- Optional glass/plexiglass sheet for protection
3D Art Frame
Great for 3D cityscapes, canvases, and floating-style displays that may extend above the frame.
- Artwork glued to the ridged grip flange
- Ideal for Micropolitan 3D map art
- No lip over the artwork
- Adjustable width, height, drop, and flange sliders
Floater Frame
A deep-profile frame for canvas wraps and thick artwork. Creates a floating effect with visible space between the art and frame edge.
- Recessed ledge for canvas and thick pieces
- Art appears to float within the frame
- Tall frame walls for a gallery look
- Adjustable width, height, reveal, and flange sliders
Custom Edge ProfilesBeta
Want full control? Every profile is adjustable with the Profile card’s sliders, or pop it out for the full editor with Standard and Minimal presets and art-stack controls. The Draw tile saves your changes as a new custom profile.

Select or Design Your Face Design
Choose from wood grains and preset patterns, generate your own material or pattern, or design one from scratch in the Layer Composer. Tap any example below to expand it.
Smooth & Wood Grains
Choose Smooth for a clean face, or select a wood grain pattern. When a wood grain is chosen, Advanced Wood Options can be configured to customize the grain density, structure, and knot count for that preset wood species.
Real frames printed by the community:
Preset Designs
Start from one of the built-in pattern presets, spanning categories like Geometric, Flowers, Animals, Plants, and more. Any preset can be edited and saved as a new customized pattern by clicking the pencil icon on it.
A few of the built-in presets:
Pro Materials
Pick from a library of realistic materials — marble, hammered metals, agate, stone, and more. Each one carries both real color and a height map, so the face actually prints with surface relief instead of a flat image. You can also describe a surface (like "weathered walnut" or "hammered brass") to generate your own material. Each generated material costs 3 credits and is saved to your account for reuse.
A few materials from the library:
Custom & Community Patterns
Under Patterns you can generate your own tileable pattern from a short prompt (like "tiny blue florals on cream"). Check the 2x2 preview to confirm the repeat stays seamless before applying it — each generated pattern costs 1 credit. You can also browse and reuse patterns shared by the community, like the ones below.
Patterns designed and shared by other users:
Edge Relief
Draw a curve and SnapFrames turns it into raised or recessed relief shaped across the face — handy for beveled, stepped, or moulded edges. It can be used on its own or stacked with a face design in the Layer Composer.
The Layer Composer
The Layer Composer is where you build a custom face by stacking layers — a pattern or texture, a photo or upload, and an edge-relief shape — into a single design that wraps the frame. Think of it like a small image editor that outputs printable 3D relief.
The core idea: images are heightmaps
Every layer is read as a heightmap — light (white) areas rise and dark (black) areas sink. That is how a flat image becomes physical relief on the printed face. High-contrast, seamless artwork gives the cleanest result.
What you can do in it:
- Stack layers — combine a pattern/material, an uploaded image, and an edge-relief layer in one face.
- Set relief depth per layer — control how far the texture rises or recesses on the printed surface.
- Choose where the face samples from — pick which layer drives the geometry so the relief reads the way you want.
- Opacity and ordering — blend layers and reorder them to fine-tune how they combine.
- Upload your own image or pull in a seamless pattern or Pro Material as a layer.
- Directional patterns can be rotated per edge so the design stays consistent all the way around.
How to use it: add a base pattern or material, layer an image or edge relief on top, set each layer's depth, then choose which layer the face samples from and preview the result. Color is handled separately over in Colorize — the Layer Composer is about shape and relief, Colorize is about which filaments print where.
Credits & My Generations
Generating your own materials and patterns is a Premium and Commercial feature — Premium includes 40 credits each month, Commercial 120 (a material is 3 credits, a pattern is 1). Credits reset every month for members. Everything you generate is saved to your account: open My Generations to browse your full history and reuse anything on a new frame without spending credits again.
My Designs & Community Designs
Save your custom patterns to My Designs for reuse later. When signed in, designs sync to your account and can be accessed from any device. Browse the Community Designs gallery to find and use patterns shared by other users, or share your own creations with the community.
Configure Part Labels
Add subtle protruding text to the back of each frame piece for easy identification during assembly. Labels are raised from the surface and appear on the back face (opposite the textured/veneered side).
Standard Labels
The default option includes part numbers, frame dimensions, and SnapFrames branding on each piece.
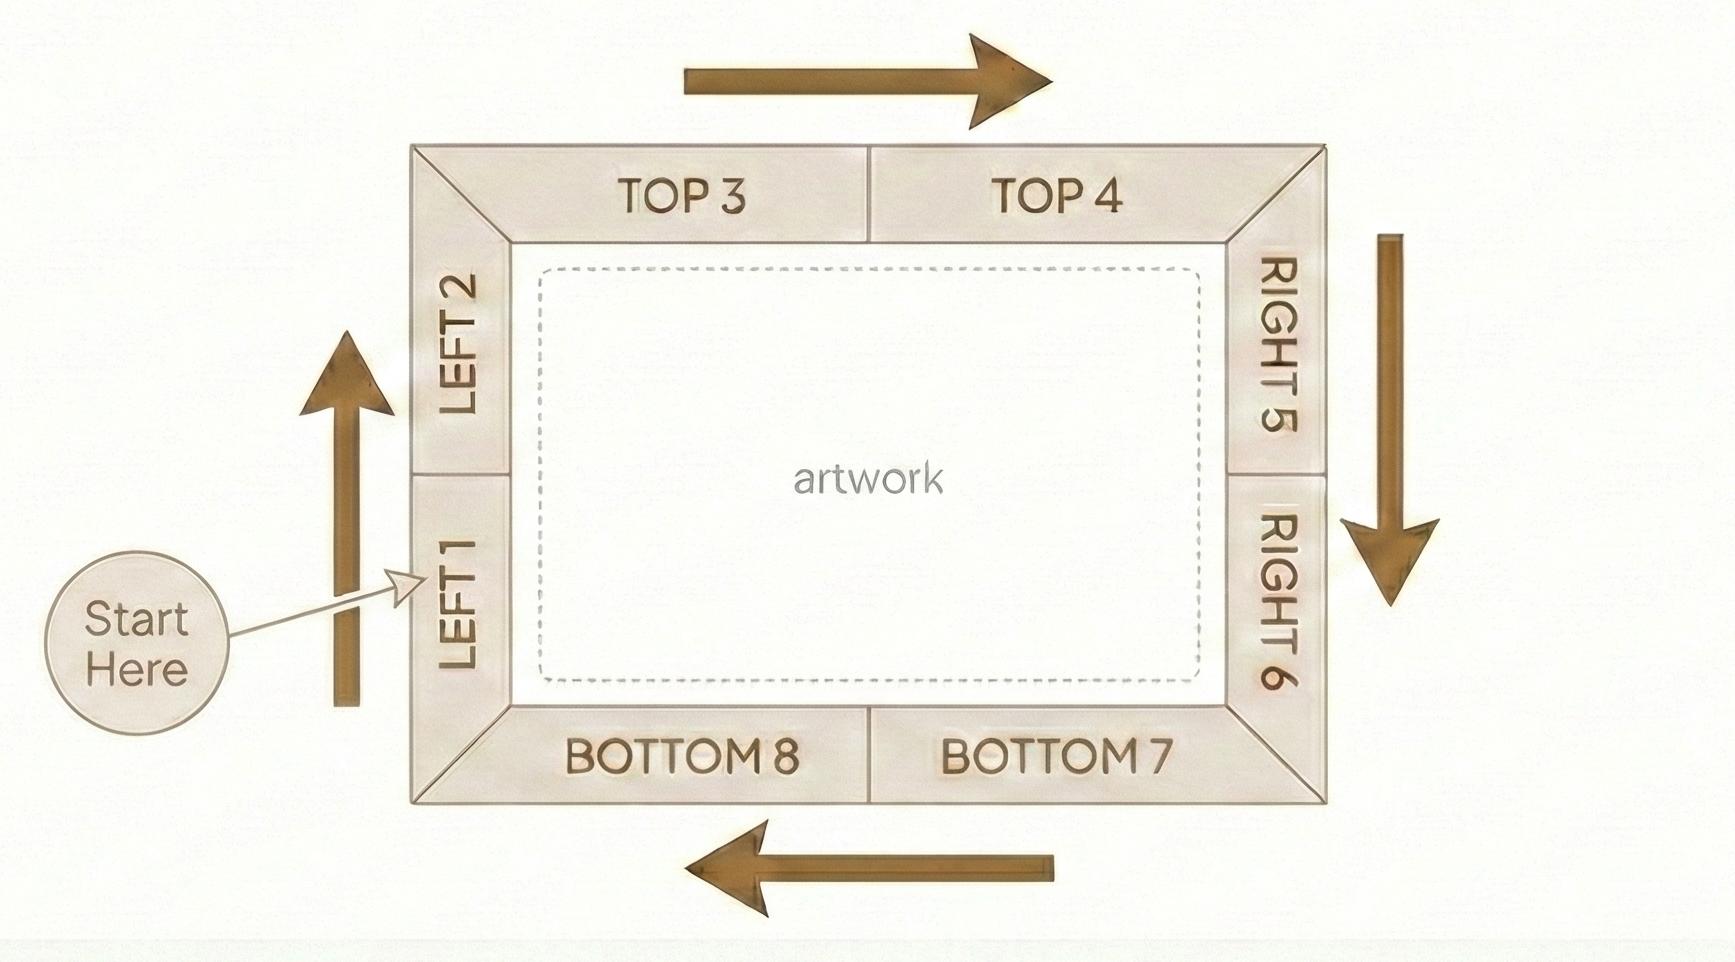
Part numbering: Each piece is labeled with its edge (LEFT, TOP, RIGHT, BOT) and a sequential number. Numbering starts at #1 on the LEFT edge (bottom piece) and continues clockwise around the frame.
Custom Labels
Customize what appears on your labels. Toggle part numbers and dimensions on or off, add your own custom text (like your brand name or a message), and upload a logo image.
Logo editor: Click the pencil icon to open the logo editor where you can crop your image (free or square), adjust brightness and contrast, and toggle invert. The "Invert" option is enabled by default, which works best for dark logos on light backgrounds. The preview shows the heightmap where brighter areas become more raised on the printed frame.
Text Size and Height
Adjust the Size slider to scale text and logos relative to the frame face (75%-200%), and the Height slider to control how much the text protrudes from the surface (0.05-0.5mm).
Tip: After generating, check the 3D Preview to confirm your labels display correctly. Smaller frames may need reduced text size to fit all the content.
Generate & Preview
Generate your frame and inspect it in the 3D Frame Preview before downloading. Use the Sample button to generate a small test piece to check texture and color.
Output tabs
Switch between Edge Pieces, Full Frame, Sample Corner, Backer, and Mat to inspect each part that was generated.
Preview controls
Rotate, zoom, and pan to inspect the model. Use Parts to hide or show individual pieces, Measure for a quick size check, X-Ray and Shaded when texture makes details hard to read, and toggle the build Plate on or off.
Generate in Draft first, then Standard or Fine
Keep Texture Quality on Draft for your first generations — it is fast and lets you dial in size, layout, and face design without long waits. Once it looks right in the preview, regenerate at Standard or Fine for the final files. Reach for Fine when the face design is intricate or has small detail; let the 3D preview be your guide — if the texture already reads cleanly, Standard is plenty.
Add Accessories
Before downloading, expand the Accessories section to optionally include additional components.
Backer Plate
A solid backing piece that snaps onto the frame. Choose with or without an integrated kickstand for tabletop display. The kickstand is automatically sized for stable support.
Mat / Passepartout
Add a decorative border around your artwork. Customize the opening size to create wider or narrower margins. Print it or use it as a template for cutting traditional mat board.
Embossed Note
Add a personalized message that gets printed on the backer plate. The text can be visualized in the 3D preview and adjusted for font size and protrusion depth.
Download Your Files
Click Download STL Files to get a ZIP containing all your frame parts, clips, prongs (if applicable), accessories, and a settings file for re-importing later.
If your design includes color (from Colorize, the Layer Composer, or a pattern with color data), pick your export format with the 3MF | OBJ toggle in the Download menu. 3MF embeds per-face colors for Bambu Studio; OBJ carries them into OrcaSlicer with your printer settings kept.
Slice & Print
Unzip the folder and import all STL files into your slicer software.
- When prompted to load files as a single object, click No
- Right-click on the build plate and click Arrange to auto-arrange parts
- Parts are already in the correct orientation (faces print vertically for max detail)
Colorize
After you generate a frame, the Colorize panel opens. This is where you add real print colors to the 3MF file — filaments, face pattern colors, face text colors, and structural part colors. Preview colors are just for the screen; Colorize is what actually carries into a multi-color print.
Filaments
Add the colors you actually own, then assign them to pattern slots, text, or parts. This keeps the design close to what you can really print.
Face Pattern
Choose how many colors to use. SnapFrames maps the best-matching colors from the design into that number of printable slots. Fewer colors are simpler to print; more colors preserve more of the original texture.
Bias Sliders
Bias changes how much of the texture each printable color claims. Use it when the automatic split is close but you want one color to show up a little more or a little less.
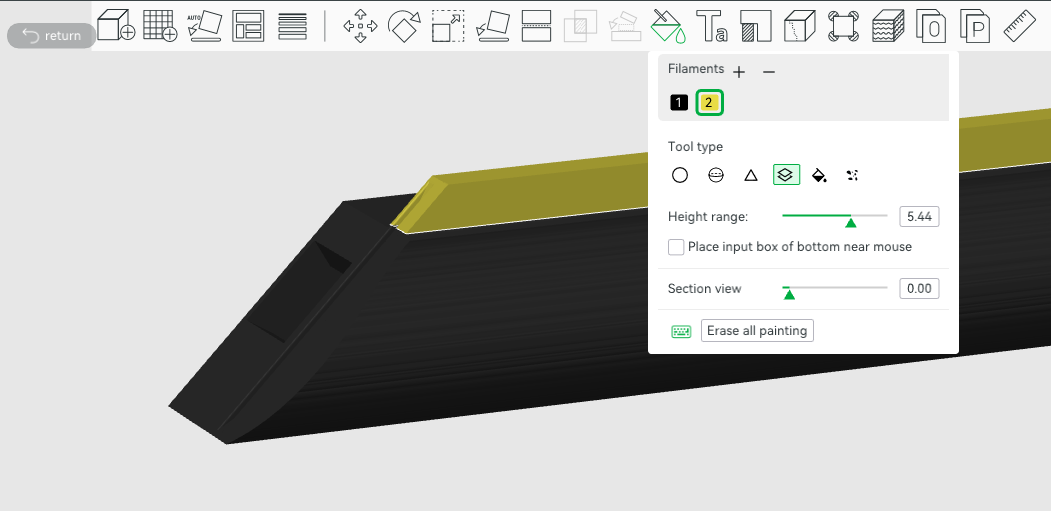
Painting
Painting is for manual cleanup or creative edits. Pick a tool, choose a filament slot, then paint or fill faces directly in the 3D preview.
Part Colors
Assign colors to the structure, clips, prongs, backer plate, kickstand, and mat. These choices are included in the colored export — pick 3MF or OBJ in the Download menu.
Print Settings
SnapFrames frames print well with the default profile on most FDM printers. Use standard wall counts and infill settings (15-20%).
Arachne wall generator mode is recommended if your slicer allows it. This handles variable-width extrusions for sharper textures and more accurate corners.

Layer Height
We recommend a 0.20mm layer height for most frames. For very fine textures or high-detail patterns, 0.12–0.15mm will provide the best results.
Printing in Color (Bambu & Orca)
When you colorize a frame, your colors travel inside the downloaded file. Pick the format with the 3MF | OBJ toggle in the Download menu (the gear next to the Download button; 3MF is the default). Each slicer has a best-fit format:
Import the 3MF. Bambu reads your exact palette and assigns the colors to filament slots for you. If a “Standard 3MF Color Parsing” prompt appears, accept it. Load the matching filaments and print.
Use File > Import on the OBJ. Orca shows an “OBJ file import color” dialog seeded with your design colors. Set the number of colors to match your design and click OK, and the regions arrive already colored, with your own printer kept. (Use Import, not Open Project.)
You can import the 3MF in Orca too. The color regions come in on separate filament slots in palette order (first region is filament 1, second is filament 2, and so on); set those filament colors to match your design. The exact colors are listed on the download screen so you can copy them in.
Materials
Recommended
PLA & Matte PLA
Best overall choice for a premium, non-glossy finish. Darker colors help to hide the seams
Silk PLA (Gold / Bronze)
Great for accent strips or decorative features
PETG
For extra strength and durability
Test First
Wood PLA
Wood-filled filaments can produce beautiful results, but dimensional tolerances are less consistent than standard PLA. This may cause wider gaps at snap-fit seams.
Use fresh or thoroughly dried filament, and print a Sample Corner first to verify the snap-fit connections before committing to a full frame.
Recommended Filaments
Matte Black PLA
Best for hiding seams
Matte White PLA
Clean, modern look
Light Brown Matte PLA
Great for wood grain
Matte Chocolate PLA
Great for wood grain
Matte Wood Brown PLA
Great for wood grain
Metallic Gold PLA
Great for accent frames
As an Amazon Associate, SnapFrames earns from qualifying purchases.
Recommended Accessories
These accessories pair well with your 3D printed frames for a polished, professional result.
Clear Acrylic Sheets
Shatter-resistant alternative to glass. Easily scored and snapped to size with a utility knife. Use in front of artwork for protection (like traditional picture frame glass) or behind photos as a rigid backer.
Mat Board
Cut custom mats using the 3D printed mat as a template. Available in multiple colors to complement your artwork.
As an Amazon Associate, SnapFrames earns from qualifying purchases.
Design Tricks & Advanced Tips
Multi-Color Frames (Even Without a Multi-Color Printer)
Assign a different color at a specific layer height for accent stripes or layered face details.
Single-color printers: Manual filament swaps at designated layers
Multi-color printers: Automatic swaps with minimal waste, or download the 3MF with embedded colors for full-color patterns
One-Piece Frame
Check One-Piece Frame in the Generate section to generate a single unified STL of the entire frame printed flat. The Full Frame tab in the 3D Preview shows the assembled result, and a dedicated download button exports the file.
How It Works
Check One-Piece Frame in the Generate section to export a single unified STL with all four edges joined at mitered corners — no snap connectors or clips needed. Picture frames still carve real prong sockets, and the hook prongs are included in your download. The frame prints flat (face-up), so part labels are omitted. You can generate this alongside Snap-Together and/or Sample Corner.
Best For
Seamless frames with no snap-together joints. Great for multi-color prints since the textured face prints horizontally (facing up), allowing filament swaps at specific layer heights for a two-tone texture effect. Also ideal for quick small frames that need no assembly or clips. Only available for frame sizes that fit on your build plate as a single piece.
Trade-offs
Only available when the assembled frame fits on your build plate. Fine relief details may be less sharp compared to vertical printing (limited by nozzle width vs. layer height resolution). Depending on the face design, supports may be needed for overhangs when printing flat.
Large Frame Tips
- Test small before printing large — use Sample mode to verify texture and color
- For large frames with many edge pieces, consider reinforcing joints with glue
- Mount the frame around chipboard or rigid backing material for added stability
- Hang from the backing rather than the frame parts for very large frames
Ready to Create?
Start generating your custom 3D-printable frame now.